0.29.5 Beta MuteMe+ / Dictation

Dictation,
at your fingertips.

A thought, a touch, a few words. Turn your voice into text with the MuteMe button already on your desk.

Draft an email, capture an idea, or get a first pass into a document. Choose local Whisper dictation on Windows, Mac, and Linux, or connect your button to built-in dictation on Windows and Mac.

Get started with MuteMe 0.29.5 Beta and a supported computer. This guide describes the beta’s Dictation features; they may not be available in your installed stable release.

MuteMe app with Not in Meeting Actions enabled, Dictation selected, and MuteMe · Whisper as the engine. Processing, microphone, pasting, and model status appear above button and memory settings.
The MuteMe app, with MuteMe · Whisper selected. View full-size screenshot ↗

Your button starts it. Your computer’s microphone captures your voice.

Outside meetings. Dictation is a Not in Meeting Action.

Permission comes first. Allow microphone access to record speech.

Two ways to turn speech into text

Choose your engine.

The same physical button can start two different experiences. Select your Dictation engine in the MuteMe app.

Windows · macOS · Linux

MuteMe · Whisper

Local speech recognition.
Controls made for MuteMe.

MuteMe records a short session, transcribes it on your computer using the multilingual Whisper Base model, and copies or pastes the finished text into your work.

  • Works offline after the one-time 148 MB model download.
  • Hold to speak or press to toggle, with a floating waveform and optional live draft.
  • Choose your microphone, language, device colors, and text delivery.
Set up Whisper

Windows · macOS

Your OS · Built in

Your familiar dictation.
One physical shortcut.

MuteMe sends a keyboard shortcut to start Apple Dictation or Windows voice typing. Your operating system handles the microphone, recognition, listening indicator, and text entry.

  • No Whisper model download or MuteMe transcription setup.
  • Use the languages, punctuation, and dictation features your OS provides.
  • Apple or Microsoft controls recognition, connectivity, and privacy.
Set up built-in dictation

Built-in dictation has its own controls. Whisper’s hold mode, silence timer, live preview, microphone selector, device feedback colors, and paste settings do not control the OS engine. Switching engines keeps your downloaded Whisper model and preferences for later.

A one-time setup

Ready for your first thought.

Start with MuteMe 0.29.5 Beta, your connected MuteMe device, and a working computer microphone. MuteMe is the control; it does not provide the recording microphone.

  1. Choose the action.

    Open MuteMe+ → Not in Meeting Actions. Enable the section and select Dictation. On Mac or Windows, choose MuteMe · Whisper. Linux uses Whisper.

  2. Meet dictation.

    Follow the welcome tour through Audio & consent. Read and accept the recording acknowledgement, then select Agree and continue. This step does not start a recording.

  3. Download and allow.

    Select Enable dictation · download 148 MB. Let setup download and verify the model, then grant microphone access and choose your paste preference.

Setup checks performance with bundled sample audio, without recording your microphone. No OpenAI account, API key, Python installation, or separate Whisper app is needed. When setup finishes, return to your text field and press MuteMe to start a new session.

Outside meetings, with an idle microphone. Dictation starts when MuteMe detects no meeting and can confirm the microphone is not in use. Unmute your selected input first; dictation does not unmute it for you. This feature captures your words for writing—it is not a meeting transcription tool.

Required for recording

Let MuteMe
hear your voice.

Whisper dictation needs microphone access. Choose Allow when your computer asks to let MuteMe use the microphone.

Ordinary mute controls do not need to record your voice. Local dictation does: it captures audio during sessions you start so it can turn your speech into text. Accepting the in-app consent step and granting your OS permission are separate steps.

Loading the speech model, keeping it ready, or opening this webpage does not start a recording.

Find your permission settings
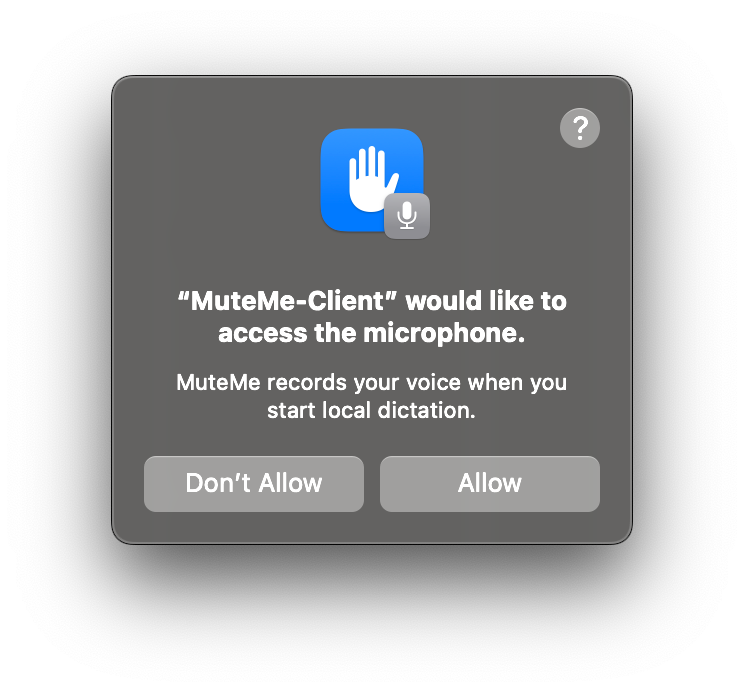
macOS prompt: MuteMe-Client would like to access the microphone. The message explains that MuteMe records your voice when you start local dictation. Buttons are Don’t Allow and Allow.
On macOS, allow MuteMe-Client to access the microphone. Windows and Linux use different permission controls.

macOS

Select Allow microphone in MuteMe, then Allow in the system prompt. If you previously denied it, open System Settings → Privacy & Security → Microphone and enable MuteMe.

For Whisper’s automatic paste, Allow pasting opens a separate Accessibility permission. It is optional: without it, you can copy and paste your transcript manually.

On macOS 12, look in System Preferences → Security & Privacy → Privacy. Apple’s microphone guide ↗

Windows

Select Open microphone settings in MuteMe. Enable microphone access and Let desktop apps access your microphone when access is blocked.

Windows 11: Settings → Privacy & security → Microphone. Windows 10: Settings → Privacy → Microphone. There is no separate MuteMe Accessibility permission for pasting.

Desktop-app access is controlled by Windows; you may not see an individual MuteMe switch. Microsoft’s permission guide ↗

Linux

Allow microphone access in your desktop environment where required. Choose a working, unmuted input in sound settings. MuteMe checks access when recording begins; a macOS-style permission dialog is not expected.

Microphone-use detection needs pactl connected to PulseAudio or PipeWire’s PulseAudio server. If microphone use is unknown, dictation cannot start.

Check the selected physical input as well as the system default, especially if you use a virtual microphone.

Using built-in dictation? The OS handles microphone access for its own recognition. MuteMe does not capture that audio. On Mac, MuteMe still needs Accessibility permission to send the configured shortcut.

Using MuteMe · Whisper

Speak. Finish. Keep writing.

Click in the text field you want to use. Start with the MuteMe button, wait for Listening, and speak naturally.

Push-to-Talk

Hold to dictate, then release to finish. This is the default mode. Pauses do not trigger the silence timer while you hold.

Toggle (Press)

Press once to start, then again to finish. Optionally stop after silence: on by default at 3 seconds, adjustable from 3 to 30 seconds.

01 / Listening

A floating waveform and timer show the session. Your device uses the recording color you selected.

02 / Transcribing

When recording ends, Whisper processes the full session locally. Each recording is limited to two minutes.

03 / Text ready

Your finished text is copied to the clipboard and, when enabled and available, pasted into your app.

A live draft while you speak

Live preview can show provisional words in the floating panel. It follows recent speech, not the entire transcript; words can change as recognition improves. The first draft needs a few seconds of audio plus processing time.

Final text is delivered once you finish. Words do not stream into your destination app during recording. The preview may be skipped on slower computers; final transcription still runs.

Paste automatically, or copy only

Paste automatically is on by default. MuteMe copies the result and sends ⌘ + V on Mac or Ctrl + V on supported Windows/Linux destinations, provided the app you started in is still active.

If you switch apps, permission is missing, or automatic paste is unavailable, use the clipboard. Turning automatic paste off copies the transcript for you to paste when ready.

Keep the right text field focused. MuteMe does not restore your cursor or check whether a field is editable or contains a password. Moving within the same app can change where text goes. “Paste sent” means the shortcut was sent, not that insertion was confirmed. MuteMe does not press Enter or click Send; review your text before submitting it.

Whisper cancels an active session if a detected meeting starts, the device disconnects, the computer sleeps, or dictation settings change. Finish your recording before changing preferences.

Platform guide

Know your computer’s options.

Whisper requires at least 2 GiB of system RAM and an app build with the matching dictation runtime. Eligibility is a minimum requirement; speed depends on your hardware.

MuteMe · Whisper platform support
Computer Minimum platform Speech processing Text delivery
Apple Silicon Mac macOS 12 or newer; Apple Silicon app Metal GPU where supported, with CPU fallback Automatic paste with Accessibility permission; clipboard otherwise
Intel Mac macOS 12 or newer; Intel app CPU; an optimized CPU path where supported Same paste and permission behavior as Apple Silicon
Windows PC Native x64; Windows 10 version 2004 / build 19041 or newer, including Windows 11 CPU or a validated faster Vulkan GPU Automatic paste into eligible active apps; elevated or restricted apps may need manual paste
Linux PC Native x64; glibc 2.31 or newer CPU; an optimized CPU path where supported Automatic paste in recognized X11 apps with the helper; clipboard on Wayland and in unsupported destinations

Whisper does not support Windows on ARM (including x64 emulation), Linux ARM, musl-based Linux systems, or 32-bit systems. Use the Linux setup guide for general app installation.

Linux desktop differences matter. Wayland sessions, including XWayland apps within them, use clipboard delivery. Terminals, unknown apps, or a missing paste helper also need the app’s own Paste command. Floating-panel behavior can vary by Linux desktop.

Using your operating system’s recognition

Built-in dictation, started by MuteMe.

On Mac and Windows, choose the built-in engine instead of Whisper. Linux currently offers the Whisper engine only.

macOS 12 or newer

macOS · Built in

  1. Turn on Dictation in System Settings → Keyboard → Dictation (System Preferences on older macOS).
  2. Choose macOS · Built in in MuteMe. Match its shortcut to the one in macOS. For example, use Control + Option + D in both.
  3. Confirm I’ve enabled Dictation and set this shortcut in macOS, allow MuteMe’s Accessibility access, and select Enable macOS Dictation.
  4. Click a text field and press MuteMe. Follow Apple’s listening indicator. A subsequent press sends the same shortcut to stop; macOS can also stop after silence.

Shortcut choices: Microphone key, the supplied combinations, or a custom combination. Fn/Globe and double-tap modifier shortcuts are not supported. The Microphone key is a separate key choice, not Fn/Globe.

Choose language and microphone in macOS. Standard Dictation requires Voice Control to be off. Apple determines whether recognition happens on-device or uses its servers.

Apple’s Dictation guide ↗

Windows 10 version 1709+ or Windows 11

Windows · Built in

  1. Choose Windows · Built in, then Enable Windows voice typing.
  2. Click in a text field and press MuteMe. It sends Windows + H, the voice typing shortcut.
  3. Wait for Windows’s listening indicator, then speak. Stop with the Windows microphone button or a supported stop voice command.

If Windows + H already works, no Whisper download is needed. Use Open Speech settings or Open Microphone settings in MuteMe if Windows needs attention.

Windows manages language, punctuation, microphone use, and recognition. Online recognition requires internet; offline availability depends on your Windows version and setup. Do not rely on an offline session without checking Windows’s behavior.

This starts Windows voice typing. It does not control Windows Voice access or Word’s Dictate feature, and it does not provide Whisper’s hold-to-talk or a guaranteed second-press stop.

Microsoft’s voice typing guide ↗

Stop built-in dictation using its OS controls. MuteMe sends shortcuts; it cannot confirm the operating system’s listening state. Disabling MuteMe’s dictation action or starting a meeting does not itself stop an OS-native recording.

Make Whisper your own

A little control
goes a long way.

These settings apply to MuteMe · Whisper. Built-in engines use their operating system’s settings instead.

Microphone
Use Automatic microphone or select an available input. Automatic follows your default input, or chooses a physical input when the default is MuteMe Virtual Microphone. If names are missing, allow access, try recording, and reopen settings.
Language
English is the default. Choose Spanish, French, German, Hindi, Chinese, Japanese, or Detect automatically. Selecting the language you are speaking can help when automatic detection struggles. These are the choices exposed in the app.
Speech sensitivity
Choose Quiet voice / room, Normal, or Noisy room. Silence detection follows audio level; background noise can affect when Toggle recording ends.
Stop after silence
In Toggle (Press) mode, keep automatic stopping on and choose a Silence duration of 3–30 seconds, or turn it off and finish with another press. The two-minute session limit still applies.
Live preview
Show or hide a provisional draft in the listening panel. It covers recent speech and can be revised. Computers marked slow during setup skip it to prioritize the final transcript.
Paste automatically
Choose immediate delivery where supported or clipboard-only use. Automatic mode adds a trailing space so successive phrases separate naturally; ordinary copy-only mode does not. In Linux clipboard-only sessions, the corresponding control is Add a trailing space.
Device colors
Choose separate Model loading color, Hold recording color, Toggle recording color, and Transcribing color. Normal device status returns when the session ends.
Load model at startup
Enable it for a faster first dictation after MuteMe starts. It is off by default. It loads the speech model into memory without turning on the microphone.
Unload model after
Choose Automatic, a Custom duration from one minute to 24 hours, or When MuteMe closes. Keeping the model loaded reduces the wait between recordings; it does not keep recording.

Speed without a cloud service

On Windows, setup compares the CPU with a compatible Vulkan GPU and chooses the GPU only if its check succeeds and takes more than 10% less processing time. Apple Silicon can use Metal; Intel Mac and Linux use CPU processing. An optimized CPU path is selected where supported.

The status area shows Processing, Microphone, Pasting, and Model. Where available, use Check performance again after a driver or hardware change. GPU acceleration is optional; the app has a CPU fallback.

Balance readiness and memory

The 148 MB download is the model’s file size. A loaded model can use several hundred MB of RAM plus GPU memory where applicable. Unloading releases memory; the saved model can load again without another download.

Automatic retention depends on installed RAM: up to 4 GiB → 15 minutes; over 4–8 GiB → 30 minutes; over 8–16 GiB → 1 hour; over 16–32 GiB → 8 hours; over 32 GiB → 24 hours.

Turning dictation off, sleeping, or closing MuteMe unloads it. Remove download deletes the model file when you no longer need it.

Know where your words go

Local with Whisper.
OS-managed with built-in.

Privacy behavior follows the engine you choose. Local transcription and the way another app handles your finished text are separate things.

Whisper stays on your computer

After setup, speech recognition works offline and does not send your audio to a transcription service. MuteMe records only during dictation sessions you start. The local worker processes audio without creating a recording file for each session.

The speech model stays on disk until you remove it. Your final transcript stays on the clipboard and in any app where you paste it. Clipboard history, clipboard syncing, and the destination app can store or transmit that text according to their own settings.

Built-in follows Apple or Microsoft

MuteMe sends the shortcut and does not capture the OS engine’s audio. Apple or Microsoft manages recognition and may use on-device or online processing depending on your system, language, and settings.

Review Apple’s Dictation guidance and Microsoft’s speech privacy statement. MuteMe’s offline Whisper behavior is not an offline guarantee for built-in dictation.

For the MuteMe app’s broader performance-data preferences, see app data collection settings.

When you need a hand

A few useful answers.

Check the selected engine first. Whisper setup and OS-native setup solve different problems.

I do not see Dictation in my app.

Install MuteMe 0.29.5 Beta, then check MuteMe+ → Not in Meeting Actions. Engine availability depends on your OS, architecture, and the runtime included in the app; the MuteMe app’s platform support is broader than Whisper’s requirements.

Pressing MuteMe does not start a recording.

Confirm Not in Meeting Actions is enabled and Dictation is selected. Finish the chosen engine’s setup, end any detected meeting, and close other apps using the microphone. Unmute the selected input. Whisper also needs a downloaded model and microphone permission. After setup opens from a button press, a fresh press is required to record. On Linux, unknown microphone-use status blocks starting.

I denied microphone permission. Can I change it?

Yes. Follow the microphone access instructions for your OS, enable access, and return to MuteMe. If the OS asks you to quit and reopen the app, do so. The in-app consent checkbox alone cannot override an OS denial.

I see words in the preview, but nothing was pasted.

The live draft is provisional. Finish the recording and wait for final transcription. Check Paste automatically and the clipboard; keep the original app active with an editable field focused. macOS needs Accessibility for automatic paste. Windows administrator apps and restricted destinations can block it. On Linux, Wayland and unsupported apps require manual paste.

Recording stops during a pause—or will not stop after one.

In Toggle mode, adjust Stop after silence and its 3–30 second duration. Background audio can delay silence detection; try the correct microphone and sensitivity. Push-to-Talk ends when you release, not when silence is detected. Both modes stop at two minutes. OS-native engines use their own stopping behavior.

Whisper feels slow or the draft is inaccurate.

Use shorter recordings, move closer to the microphone, reduce background noise, and choose your spoken language. Keeping the model loaded avoids reloading between sessions. Live preview can be disabled on slower computers; the final transcript can differ from the draft. Review names, numbers, and punctuation before sending.

My Mac’s built-in dictation shortcut is not working.

Verify Dictation is on, Voice Control is off, Accessibility is allowed for MuteMe, and the shortcut matches in both places. Fn/Globe and double-tap modifier shortcuts are unsupported. Custom shortcuts accept modifiers plus a letter, number, Space, or F1–F20; function keys can also stand alone. Letter and number shortcuts use US physical key positions, so a function key may be easier on a non-US layout.

Can I use this to transcribe a meeting?

Dictation is designed for writing outside detected meetings, with an idle microphone. It does not provide meeting transcription, speaker identification, summaries, or a recording archive. A detected meeting cancels a local Whisper session. Built-in dictation must be stopped through the OS controls.

Help and feedback

Tell us how it works for you.

Open the Support tab in the MuteMe app. Include your app version, operating system, chosen dictation engine, and what happened. Mention your Linux desktop/session type if relevant.

Guide updated November 7, 2026 for MuteMe 0.29.5 Beta. Screenshots show the macOS interface; appearance may vary by operating system and app version.